Flexible Solutions
SERVICE SELECTION

Furniture Collection
Bought new furniture? We'll help you get it from the store and even put it together.
Junk Disposal
Leave the dirty work to the trained professionals. Fast, clean and green clearance.
Storage Units
Rent a safe storage unit to store items while moving.We'll keep your items for you.
Packing Services
Let us help you prepared all your items for a safe and damage free transportation.
Student Removals
Moving to college does not have to be a hassle - hire our team to help you move.
Small Removals
Have a package or a single item delivered fast to any point or address in London.Hello and welcome to Beuser Group – the leading provider of top notch man and van services across London.
The movers and packers in London you want by your side
No matter whether you have a home or office removal on your hands, we are going to help you complete it in a manner that is up to all industry standards, without stress, hassle or strain. A London man and van from us is the ultimate solution to relocation projects big and small, simple and complex. We at Beuser Group are licensed and insured to handle domestic and commercial moving jobs alike, and there will be nothing to stop us deliver a service of a supreme quality to you, whenever you ask us to.
Why choose us
There are many good reasons why you should consider opting for our expert man and van team no matter where in London you are. Having Beuser Group by your side comes with a lot of benefits and perks, including but not limited to:
- Our team of certified, expertly trained and extensively experienced movers, packers and helpers who just know how to get a job done right
- Our large fleet of modern MWBs, LWBs and SWBs, all navigated through state of the art GPS, equipped with safety gear and loading tools
- Our flexible schedule and competitive pricing
Get in touch with the polite and knowledgeable experts at our customer support in order to learn about the way in which we are going to individually plan your project, prepare for it and then carry out the job in a manner up to all industry standards.
A London man and van for every situation
Feel free to count on us for a variety of full property and partial relocations in London, including but not limited to:
- Home moving
- Student Removals
- Office removals
- Single item deliveries
- Fragile item moving
A wealth of additional services
A London area man and van team from our company would be the perfect solution to all those kinds of projects and many more. Additionally we have the equipment and knowledge to handle basic rubbish removals, end of lease sanitation, packing and storage solutions for our clients too. If you need any of those things, do not hesitate to inform us. The best thing is that all our moving related services in London are not only efficient and insured, but they are also a hundred percent eco-friendly. We do what is best for you and the environment too.
Premier quality garbage collection and disposal from Beuser Group
In order to help you prepare better for your upcoming relocation, we at Beuser Group will help you get rid of any amount of junk prior to your relocation. We are licensed for junk disposal in London and do it with diligence and care unmatched by anyone else here. Having a rubbish clearance carried out on the premises before you move out will help speed up the packing process and will make the property more attractive to potential buyers and renters. All junk collected is recycled and disposed of in an eco-friendly manner.
The best prices for man and van solutions on the territory of London
Thanks to our special custom removal quote calculator we are able to offer you the best price man and van services in London come on. This is confirmed by the tons of outstanding customer reviews that we are receiving on a regular basis by past clients of ours. All you need to do in order to see that is precisely the case, and our moving solutions are not going to strain your budget even one bit, is to request a free quote for the full price of your project – do that by filling out our online form, or just give us a call.
Our services are available throughout all 32 boroughs of London. This marvelous city of ours is capital not only of England, but in a sense the world too. Established as a Roman military camp in the first century AD is one of the largest and most important settlements on the planet, from a financial, cultural and administrative point of view. Nearly 20 million tourists are visiting London on an annual basis in order to enjoy the major landmarks throughout the capital, some of which like Westminster Abbey, The Eye and Buckingham Palace are synonymous with the name of London. Additionally, the City, as well as the newly developed financial district at Canary Wharf, account for more annual turnover than any other place – the London stock exchange is busier than even Wall Street. Both South and North London have many very comfortable suburbs where you will find peace and quiet from the stress and hassle of the more central areas of the capital. Check out Bromley and Brent for instance for illustrations to that point.
London is visited by as many as 50 million people every year. British Museum is indeed the leader in terms of tourist attractions here, with 10 million annual visitors. The Museum of Natural History is another popular venue. Sir Jon Soane’s Museum is a smaller but equally attractive option.
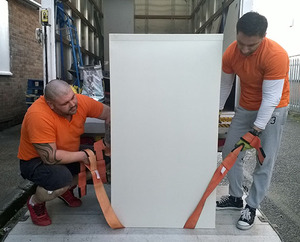
We use the best moving equipment and tools in London
We utilise state-of-the-art moving equipment and tools needed for a smooth removal in London. Our skilled movers and packers will show up at your door with all the necessary tools needed for handling and moving your valuable possessions safely and quickly. Some of those include moving dollies, straps, ramps, trolleys and other. We will also protect your premises with appropriate floor and wall protectors and moving blankets. We treat your belongings and your property with great care.
London’s most flexible man and van services
We offer flexible hours to meet your busy schedule. Thanks to their busy day-to-day lives, most of our clients prefer to have their move carried out after working hours or during weekends. We are proud to say that putting your needs first is our priority. Therefore, our attentive movers in London are at your service at any time that’s suits you best. When you combine our unmatched man and van service with flexible schedules and fair prices, there’s no reason to hire anyone other than Beuser Group.
We offer free in-house estimates
If you want an accurate estimation for your removal, you can contact us and book your free in-house estimate. Our experienced man and van specialists in London will come to your house and carry out an assessment based on the number of items to be moved, transit distance and other factors. This will help you control your costs because the estimate you receive is fixed, with no additional costs and hidden fees. Our goal is to help you stay within your moving budget by offering competitive rates.
If you are planning to move to London but still haven’t decided which area will suit you the best, perhaps you should consider Richmond Upon Thames. This area has more of a small town feel and provides great options to get into the centre of the city. You can also consider Clapham, one of the trendiest areas in London, a popular area for young professionals. If you’re looking for a slightly cheaper area to live in the English capital, consider Crystal Palace.
Get A Price Estimate
Free Quote

Easily Get In Touch
OUR INFO
About Us
TEAM INFO
We are a dedicated man and van company with a diligent team of movers that is always there for our clients. Choose from a wide selection of moving and other options to best suit your needs.
Our moving team is well equipped, drives top grade removal vans and consists only of well trained professionals. We guarantee timely completion of the move and safe item delivery.